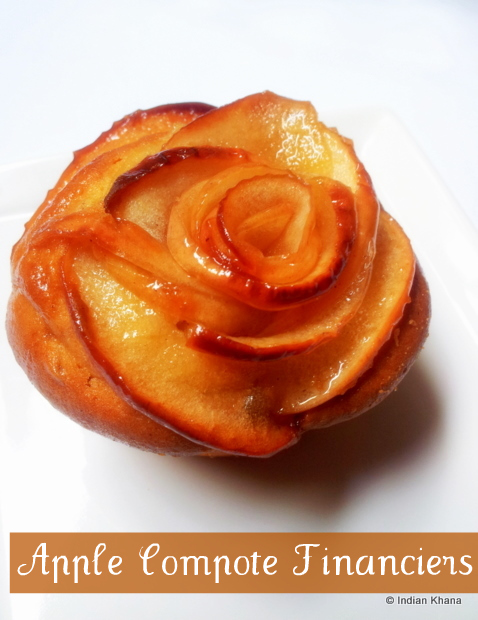
Showing posts with label Baking with Oil. Show all posts

Eggless Butterless Chocolate Cupcakes

Easy Vegan Chocolate Cupcakes recipes
I made this super easy and super moist vegan cupcake to take along to my sister place but last moment we couldn’t go and thus it making it to blog.  This cupcakes are very easy to prepare it doesn’t require any beater or special gadgets, just mix everything with a spatula and we are ready to go,  added bonus this one is eggless plus butter less. 
Eggless butterless Vegan chocolate cupcakes recipes
I have made few batches as it’s very simple recipe and all the ingredients always easy to find in pantry and always result in soft and moist cupcakes.  These cupcakes are good by itself but of course frosting does add extra frill,  I run out of butter so I didn’t do frosting but just sprinkle some chocolate rise.  If you wish you can do frosting and enjoy these yummy cupcakes. 
Easy Vegan eggless butterless chocolate cupcake recipes
Ingredients: [Yield 6 cupcakes]
Plain Flour - 3/4 cup
Cocoa Powder - 2 tbsp
Baking Soda - 1/2 tsp
Salt - a pinch
Granulated Sugar - 1/2 cup
White Vinegar - 1/2 tbsp
Olive Oil - 3 tbsp
Instant Coffee/Espresso Powder -  1 tsp
Water - 1/2 cup
Vanilla Extract - 1 tsp
Chocolate Rice - 1/4 cup [optional]
For Frosting [I didn't use frosting]
Butter - 4 tbsp
Cocoa Powder - 1/3 cup
Icing Sugar - 1 cup
Milk - 2 tbsp
Vanilla Extract - 1 tsp
Easy eggless butterless chocolate cupcake recipe
Method:
1.  Boil water and add coffee powder, mix well and keep aside. 
2. Preheat oven to 350F or 180C and prepare muffin tin with cupcake liners.
3. In a bowl shift flour, soda, cocoa powder and salt.
4. In a separate bowl, mix together prepared coffee, sugar, vinegar, oil and vanilla extract.
5. Add wet ingredients with dry ingredients and stir well to combine everything, make sure there’s no lumps.
~ Mixture will be thin, so don’t panic.
6. Fill cupcake liners with batter till 3/4 full, if using chocolate rice then sprinkle on top. 
7.Bake for 18 to 20 minutes or until a skewer inserted in centre comes out clean.  If not bake again for 3-5 minutes and repeat the test. 
7. Remove from oven and let pan cool for 5 minutes then remove cupcakes from pan and let it cool on a wire rack completely.
Vegan chocolate cupcakes recipe
For Frosting
While cupcakes get's cool prepare frosting. 
1. Melt butter in a sauce pan or in microwave.  Add cocoa powder with butter and stir until smooth. 
2. Add half of icing sugar, stir, add 1 tbsp milk and stir.  Repeat again for remaining sugar and milk.  Add vanilla extract and stir until smooth.  If it’s runny then add more icing sugar.
3. You can simply spread frosting over cupcakes or fill it in piping bag and do desire design.
You can see how moist and light these cupcakes are inside.
Eggless butterless chocolate cupcake recipe
Have a nice day ~~

Open-Face Plum Cake Recipe

Open Black Plum Cake Recipe

I made this cake for my in-laws and couldn’t post it due to my blog break, now what better than to post a cake before Easter and the fact that this cake is so simple; makes it more appealing.  I always like plum and decide to bake something with it this time.   After little search I end up at Martha Stewart recipe, a very simple recipe.  I have halved her recipe and made one cake. 

Plum Cake recipe2

I liked this cake texture, it was just so perfect, plum juice flowing all over the cake making it look so pretty and it goes without saying everyone liked it.  So if you are looking for some easy and quick tea time cake with fruit then this is for you.  Before moving over to recipe…wishing everyone Happy Easter and long weekend. 

Easy plum cake

Ingredients: [ Serves -6 ]
Recipe Source: Martha Stewart

Plain Flour/Maida - 3/4 cup
Baking Powder - 1 tsp
Sugar - 3/4 cup + 1 tbsp
Salt - 1/4 tsp
Milk - 1/4 cup
Vegetable Oil - 2 tbsp
Egg - 1
Plums - 5-7 [ I used black plum]
Cinnamon Powder - 1 tsp
Cold Unsalted Butter - 1 1/2 tbsp [cut into small pieces]

Plum recipe cake recipe plum cake recipe

Method:

1. Grease a 8” or 9” pan with 1/2 tbsp of butter and 1 tbsp of flour. Dust of excess flour from pan.  Preheat oven to 400F or 200 degree. 
2. Wash, halve and pit plums.  Make sure not to use very sour plums or over ripen plums.  I used black plums here, you can use red/black whatever you wish.

Plum fruit Cake

3. Shift flour, baking powder, salt and keep aside.  In a wide bowl add 3/8 cup sugar, milk, oil, egg and whisk well to combine everything.  Add 1/2 tsp of cinnamon powder and mix.

Plum fruit cake recipe

4. Add flour in batches and fold gently.

Easy  black plum fruit cake recipe

5. Pour batter in prepared pan and arrange plums with cut side up, over batter.  Sprinkle remaining sugar, cinnamon powder over plums, dot with butter. 
~ I also inserted small pieces of plum inside pan, that’s why you can see red plum juice in cake.

Easy  black plum fruit cake recipe1

6.  Bake for 30-35 minutes or until a toothpick inserted in centre comes out clean.  Mine took 40 minutes to bake.  Let the cake cool completely on a wire rack and cut in desire shape.

Open face black plum cake recipe

~ Cake taste better next day.  Look at the sauce on pan edges, so beautiful right? 

Homemade easy plum cake recipe

Would you like a bite?  And this goes to Radhika's I Love Baking Event..

Easy plum cake recipe

Note:

1. Refrigerate and you can keep the cake for 1 day, more than that plum might get spoil or sour.
2. Try not to use very sour plums, it will spoil cake taste.
Have a nice day ~~

Eggless Chocolate Walnut Cookies | Brownie Cookies Recipe

Chocolate Walnut Honey Cookies Recipes eggless-1

To mark start of the year I’m posting this soft, crunchy and delicious Eggless Chocolate Walnut Cookies.  I like to bake cookies more than cake as you can see I have few cookie recipes posted, this is again one of the easy eggless cookie recipe & I baked this cookies for my nephew as for him anything as to be chocolate like I made for him Eggless Chocolate Cookies and Eggless Chocolate Chip Cookies.  But for me more than chocolate walnut cookies it’s like Brownie cookies, as it taste like brownie, soft, dense and delicious.

Eggless Chocolate Walnut Honey Cookies Recipes

Honey can be good sweetener in baking cause of it’s rich flavour and texture, cause of honey the cookie stays moist & edges doesn’t becomes hard/crisp and walnut gives the good crunch.  These cookies are so simple to prepare with minimal ingredients and can be put together in around 20 minutes.   Double the recipe to bake this for large batch, but I suggest start with the listed quantity, this cookie recipe is so easy that it actually doesn’t require step wise pictures, just put everything together, mix and bake..can it get simple than this?

Eggless Walnut Honey Chocolate Cookies Recipes

You can dust the cookies with icing sugar for festive season like Christmas and New Year, if you wish or have it as it is.   I personally like these beauties as this so I dusted the sugar to only one cookie.

Eggless Walnut Honey Chocolate Cookies Recipes1


Ingredients:
[Makes 12-15 cookies]

Plain Flour - 1 Cup
Brown Sugar - 1/4 Cup
Cocoa Powder - 1 tbsp
Baking Powder - 1 tsp
Baking Soda - 1/2 tsp
Salt - a pinch
Honey - 1/3 Cup
Vegetable Oil - 1/4 Cup
Vanilla Extract/Essence - 1 tsp
Chopped Walnut - 1/3 Cup
Icing Sugar - To dust cookies [optional]

Eggless Walnut Chocolate Cookies

Method:

1.  Preheat oven to 180C or 350F.
2. Ina bowl whisk together plain flour, cocoa powder, baking powder & soda, sugar and salt. 
3. In another bowl whisk oil, honey and vanilla extract well until everything is combine.  Add this to flour mixture and mix everything well until smooth dough forms. 
~ If the dough is sticky then add 1-2 tbsp of plain flour and mix again.  If you think moisture is more then refrigerate the dough for 20-30 minutes and then bake.
4. Now add chopped walnut and mix well again. Divide the dough into equal portion of 12 to 15 pieces and shape into rounds. 
5. Place a inch apart these on a baking tray line with baking sheet and bake for 10-12 minutes or until the edges becomes light brown.  Cool completely on wire rack and store.
~ Keep a eye on cookies after 10 minutes.
Dust the cookies with powder sugar to make it look snowball cookies.
Due to honey these cookies stays fresh @ room temperature even after 2 weeks, but during summer you may want to store this in fridge.

Have a look at the texture.

Eggless Walnut Honey Cookies Recipes

Note:
~ Press the cookie dough to flat and then bake if you wish or just leave it round and bake, while it’s baking it forms the shape.
~ You can add 1/3 cup of chocolate chip for the extra chocolate kick, add together with walnut.
~ If you don’t like chocolate then ignore the cocoa powder and make it as walnut cookies. 
~ If you don't want to bake the cookies immediately then wrap the bowl with a cling, refrigerate and bake when ready.

Chocolate Walnut Honey Eggless Cookies Recipes
Want to have a bite? Smile  And these cookies goes to Srav's Chocolate Fest Event.

Eggless Choclolate Walnut Cookies

Have a nice day and year ahead ~~

Apple Compote Financiers


Apple Compote Financiers, does the name sounds complicated to you? No? It sure did to me but then when I get to know the recipe I was surprised with it’s simplicity. While I was waiting for other to get ready and browsing few magazines at KL hotel I found this one, got attracted to the beautiful pictures, and gain the knowledge about financiers :) So you see it’s good to read.


The recipe was so simple and attractive that I quickly clicked pictures of the recipe on my phone for my reference. All the spices used here gives very aromatic flavour, while I was clicking the pictures of financiers it was smelling so good that I wanted to eat it right away :D This financiers is also very soft in texture, though I have used a egg here but I 
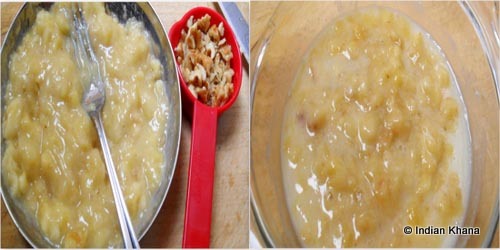
guess this is one of perfect recipe to make egg less. Just use apple sauce or apple puree instead of egg and enjoy it, don't let that egg stop you from trying this. I have plans to make this egg less next time too.


I followed the recipe as it is but next time I am going to make few changes, like instead of just adding the compote slice on top of the muffin, I think if we mix 1/4 of compote slices with muffin/financiers batter it's much better as we also get to bite apple in the muffin.

Makes 6
Ingredients:

For Apple Compote Slices

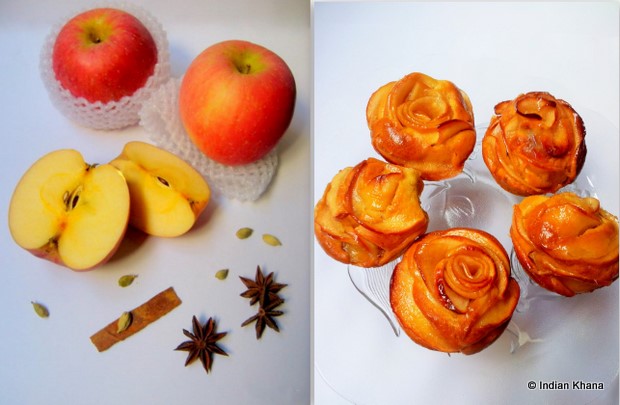
Apple - 2 Big [ I used Fuji Apple]
Water - 300ml
Caster Sugar - 2 cups (200gm)
Green Cardamom - 4
Star Anises - 2
Cinnamon Stick - 2' piece
  
For Financiers
Plain Flour - 1 Cup+ 1tbsp (130gms)
Cinnamon Powder - 1/2 tsp
Baking Powder - 1/4 tsp
Brown Sugar - 1 tbsp (15 grams) [I used dark brown sugar]
Caster Sugar - 2 tbsp (30 grams)
Lemon Zest - 1/4 tsp
Egg - 1
Vegetable Oil - 2 tbsp (30ml) [ I used sunflower oil]
Milk - 4 tbsp (60ml)


Method:
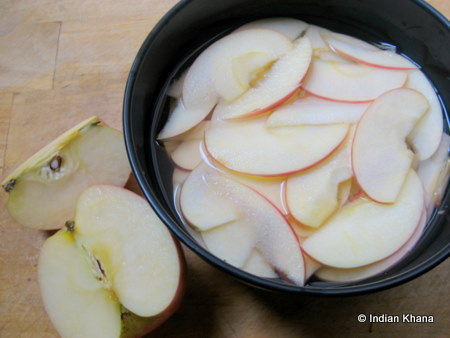
1.  Wash, core and thinly slice apples, immerse in water until ready to use it.   We don't have to peel apples.
~ You can use slicer or a sharp knife, not sharp enough to hurt yourself :D ...I used knief and did pity decent job, what you say?  

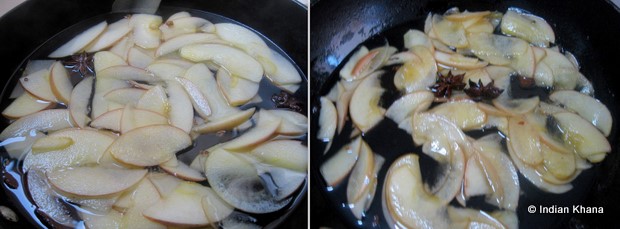
 2. In a pan or sauce pan add water, sugar, spices, apple slices and bring to boil on high flame. 

3. Simmer in low flame until apples slices become tender or for around 20-25 minutes.  Drain apple pieces and keep aside to let it cool.


4. Keep simmering the sugar syrup and make it thick, this we can use it as glaze.  

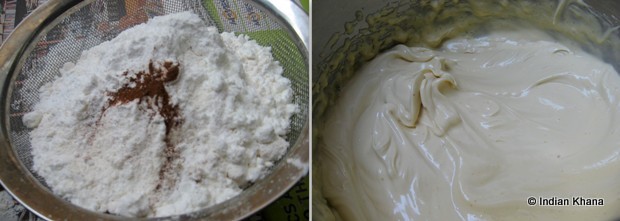
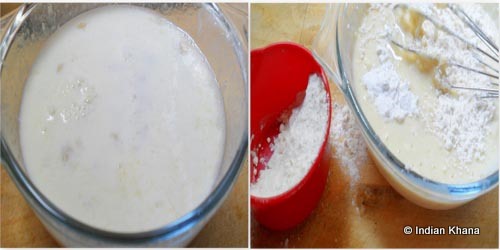
5. Meanwhile we can start working on our financiers.  Sieve flour, cinnamon powder, baking powder and keep aside.

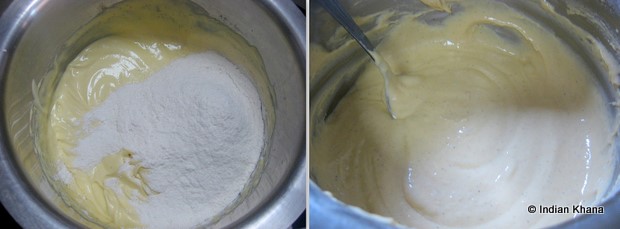
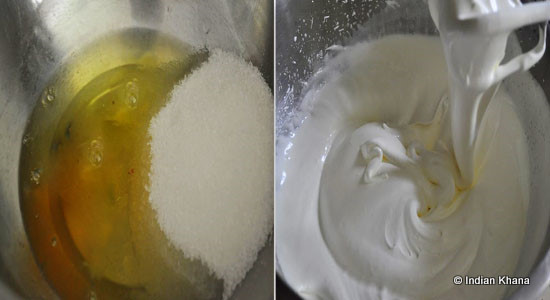
6.  In a bowl mix egg, sugar, oil, milk and lemon zest.  


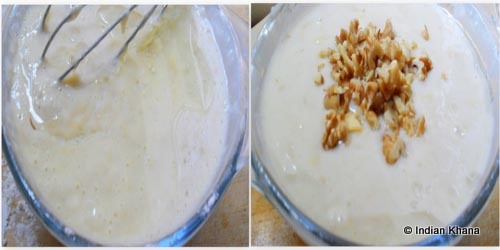
7. Fold flour in batches and mix gently, avoid any lumps. 


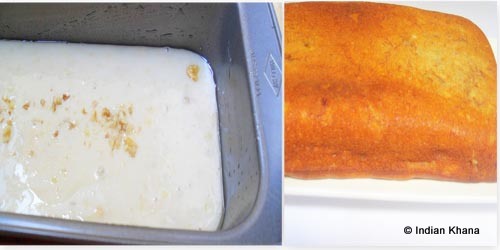
8.  Preheat oven to 180C/320F and grease muffin tray or whatever you going to use to bake these.

9.  Spoon batter into prepared muffin tray until 3/4 filled.  Place the apple slices on top of each muffin in any design you prefer and bake for 20-25 minutes or until a toothpick comes out clean inserted in the middle.  Mine was done in 22 minutes so do keep a eye after 20 minutes. 


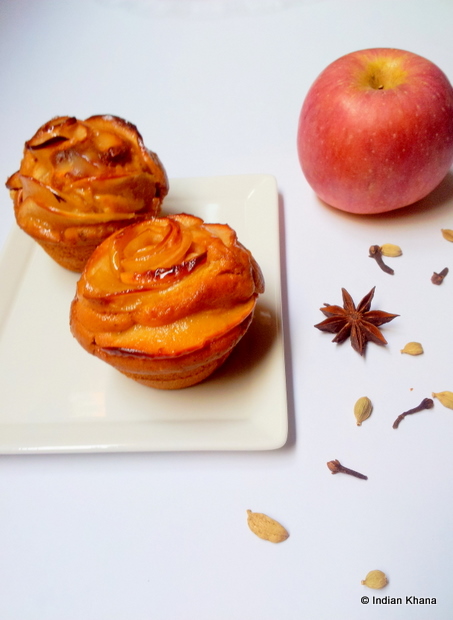
 I tried flower design, things to note are:
~ Keep apple skin part on top and working with one slice at a time.
Take a slice of apple, roll it tight to make bud and place in the center of muffin,  now start doing the petals by placing one slice at a time around the bug to make it flower.  

Another way to do is, you make the flower and then place it on top of the muffin.  For this too we have to do the same thing, make a bud and start creating petals by arranging the apple slices around it, while making the flower hold it between your fingers so it won't fall apart.  Just be gentle and careful when you place the flower/apple slices on top of the muffin as the batter might overflow so make sure you fill only 3/4 of the tin.  If you think you have place less slices then arrange few more.

I found both the way of making flower easy, keep the slices straight on the muffin makes it little messy as we tend to touch batter.  And the 2nd style of making the flower and placing may overflow the batter, but in the 2nd method we can get better and clear flower design.    So you see the picture the left side 2 flowers are done in hand and then arranged in the tray and the right side one I used 1st method ie arrange the flower on the tray itself.

10.  Cool on a wire rack completely before glazing.  If you are not glazing then you want increase the sugar in the muffin as it's not very sweet. 
~ While unmolding if the muffins doesn't comes out then just use a knife or back of spoon and gently run over the edges as we don't want to scratch the tray or break the muffin.  The muffin will be out of tray so it's easy, don't panic like me :)


Note
~ You can make any muffin and top it up with apple compote.
~ Don't let the cooked apple slice stay out for long, it will start to change colour.
~ I kept the plate of cooked apple slice over a bowl of cold water to cool the apple slices and make it easy to handle while arrange it.
~ If you want to make it egg less, replace one egg with 1/4 cup of apple puree or any other fruit puree  OR 1/4 cup of apple sauce or even 1/4 cup of whipped tofu.
~ You may add 1/4 of compote slice to the batter then scoop it to tray and top it up with remaining slices. 

This last 4-5 days if refrigerated.  I'm happy to send this to Lubna's Joy from fasting to feasting IV.


Have a nice day ~~

Vanilla Cake with Frosting

Last week was my neighbor cum friend anniversary and like last year I baked a cake this year too.  Last year I did a tutti fruity cake with butter cream frosting and this year I decided to go with vanilla cake as she doesn't like chocolate. I wanted to try cream frosting and this seems to be perfect occasion for it.  I followed the sponge cake recipe from Prema blog and for the design too followed her chocolate cake recipe, her steps are quite detail n helpful and ofcourse she cleared all my doubts generously so thanks to Prema :)  


Ingredients:

For Sponge/Vanilla Cake

Plain Flour - 130 grams/ 1 Cup heaped
Egg Whites - 4
Egg Yolks -7
Granular  Sugar - 200 grams/ 1 Cup
Salt - 3 grams / a pinch
Milk - 30 ml / 2 tbsp
Oil - 30 ml / 2 tbsp
Vanilla Essence - 1 tsp

For Cream Icing

Whipped Cream - 200ml
Icing Sugar - 130 grams / 3/4 Cup
Pink Food Color - 1/2 tsp


Method:

1. In a bowl beat egg whites and sugar until sugar dissolves and egg white form peaks.


2. Add egg yolks and beat until everything blends well.  Double boil for 2 mintues or until it reach 40-42C.


3. Add flour and mix well.  Now add vanilla essence, milk and oil and mix well to blend everything together. 


4. Preheat oven to 180C and grease a 9' pan and pour this cake batter.  Bake for 30-35 minutes or until the top becomes golden brown.  Insert a toothpick or knife in the middle, if it's comes out clean then the cake is cooked if not bake for 5 minutes more. 

5. Let the cake cool completely on a wire rack till we prepare the icing.  


6. Beat the whipped cream and icing sugar until it form peaks.  Divide the cream into 2 parts, in one part add any color of your choice, I used pink and mix well. 


7. Once the cake is cooled cut it into 2 layers.  Do it slowly and this cake is very soft and it tends to break.  

8. Add a good amount of whipped cream on one layer and over the top well.  Remove excess cream.

9.  Now keep the second layer cake on top if it and cover the whole cake with pink color cream.  


10. For cake decoration you can do anything that fancy you, I just tried here basket weave  design and used pink and white color cream, so we need 2 piping bags one with pink and other with white whipped cream using wave tip.


11. Draw vertical 2-3 lines with pink color and then on top of if white horizontal lines.  

12. Pipe vertical lines and then horizontal one's that fits the horizontal lines.   Repeat this process to cover rest of the cake.  


13.  On a cake top I did rope design which is done with white cream using star nozzle, arch the pipping bag and draw a curve in 'S' shape; insert tip under the bottom curve of the "S" shape and draw a curve 'S' again.  Repeat this for the whole cake.  

14. In the center written is happy anniversary, just add some brown color with white whipped cream.    You can place some fresh fruits or flowers too. 


And this how the cake looks inside.


Eggless Banana Cake | 200th Post

How you guys doing? I know I had kinda unexpected break due to various reason which we should not focus on.  I'm so glad to say this is my 200th blog post and it took me almost 3 years ...infact just 1 one more month and it will be 3 years of blogging.  And as the norm goes everything celebrated with sweet/dessert so how can I miss this occasion?  I had some plan for 200th post but then I settle myself with simple banana cake. 


The cake is so good you have to try this.  In a week's time I already made this cake 4 times, yes it's that good, easy and super hit with everyone at my place.   This makes a perfect tea time cake, very soft, dense and delicious.  

Ingredients:

Plain Flour - 1 Cup
Granular Sugar - 3/4 cup [1 cup if using caster sugar]
Ripe Banana - 1 Cup mashed [I used 2 long bananas]
Cooking Oil - 1/2 Cup
Fresh Curd/Yogurt - 1/4 Cup [ OR 1 egg]
Fresh Milk - 1/2 Cup
Walnut - 1/4 cup chopped
Baking Soda - 1/4 tsp
Baking Powder - 1 tsp
Salt - a pinch


Method:

1. Peel and mash bananas with a pinch of salt, chop walnut and keep aside.

2. In a bowl beat sugar with yoghurt until fluffy.  Add mashed banana and mix well until thick.


3. Add milk and beat well, fold flour in small quantities with baking soda & powder and combine everything well.


4. Add oil and mix well until oil blends with mixture.  Lastly add walnut and mix it.


5. Pour the mixture in a greased tin and bake at 200C for 20-25 minutes or until a toothpick comes clean, mine was done in 20 minutes.


Cool on a wire rack and cut in desire shape.  Every time this cake comes so well, I have used bread tin, round cake tin, square cake tin to bake this cake.  


Well the uneven shape is cause I cut the cake before it cool completely, so you let the cook gets cool and enjoy the delicious yet easy banana cake. 


Have a good day ~~~