Showing posts with label How to. Show all posts

Homemade Kitchen King Masala Powder Recipe


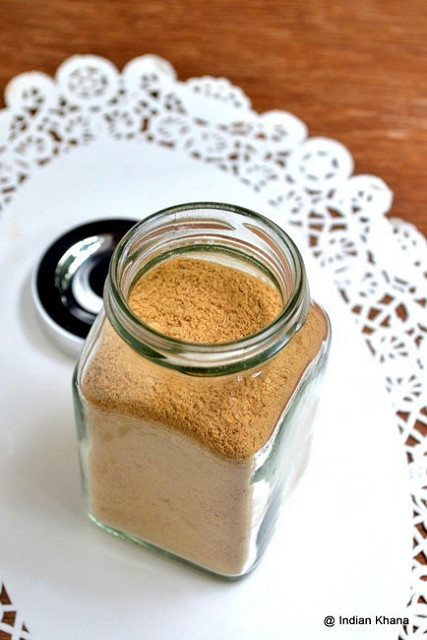
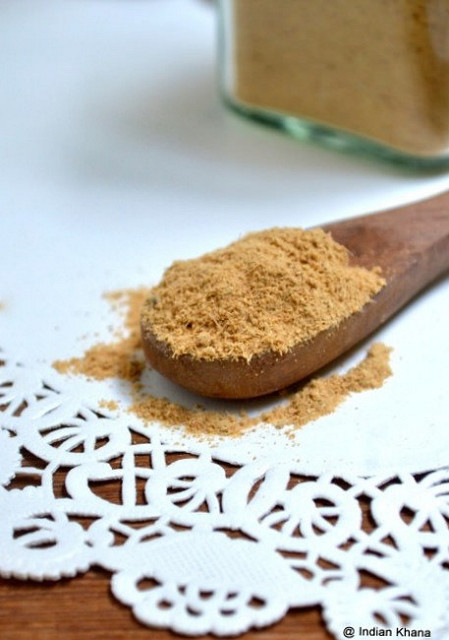
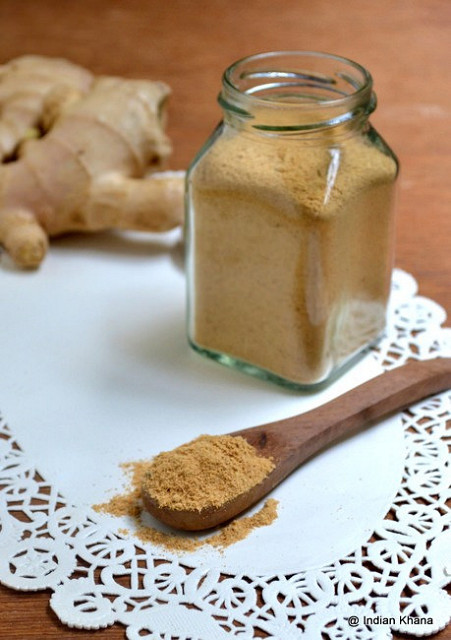
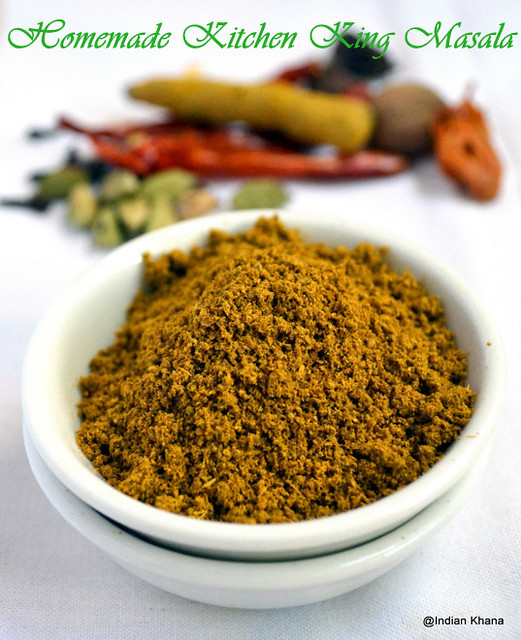
Kitchen King Masala is one of my favorite masala powder and it's used in many North Indian recipes.  The flavorful kitchen king adds wonderful aroma and taste to any dish perhaps that's why it's called Kitchen King?  I love badshah brand masala over any other brand but unfortunately it's difficult to get badshah brand masala here unless I am lucky to lay my hands on that and the funny thing is I never got Kitchen King in badshah brand, I mostly end up using Everest.


You may know by now I like to make my own spice powder be it garam masala, garlic powder, ginger powder, dabeli masala or any other thing but I never really thought of making my own kitchen king until recently.  I followed list of ingredients from Everest Kitchen King Masala packet and made my own aromatic kitchen king powder.   You may find list of ingredients long but it's really flavorful and fabulous spice powder to have in your kitchen, if you don't have one or two ingredients you can skip that.  If you can get poppy seeds do add that and have your very own home made kitchen king.


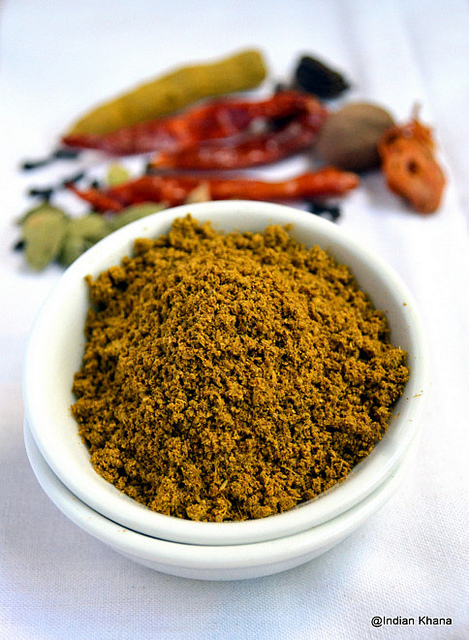
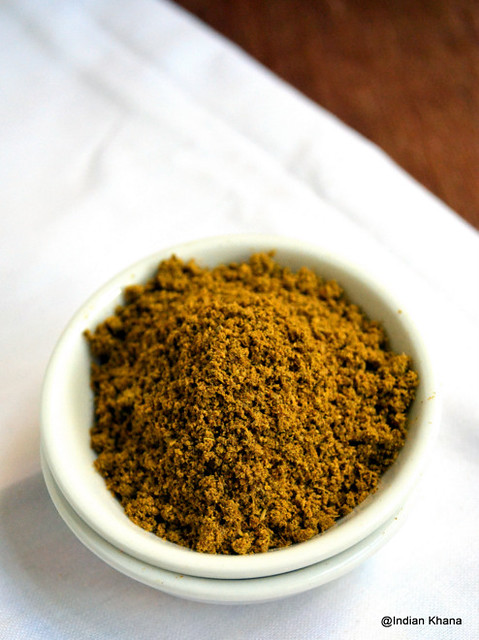
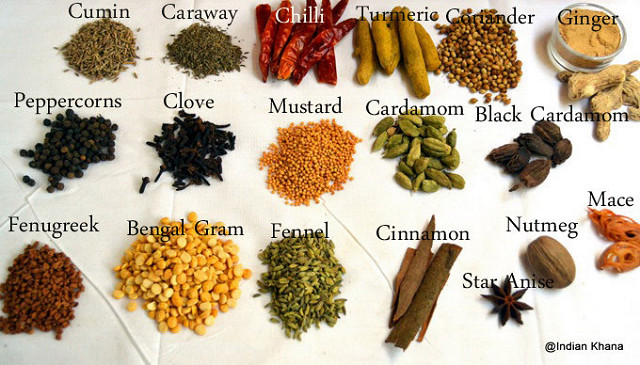
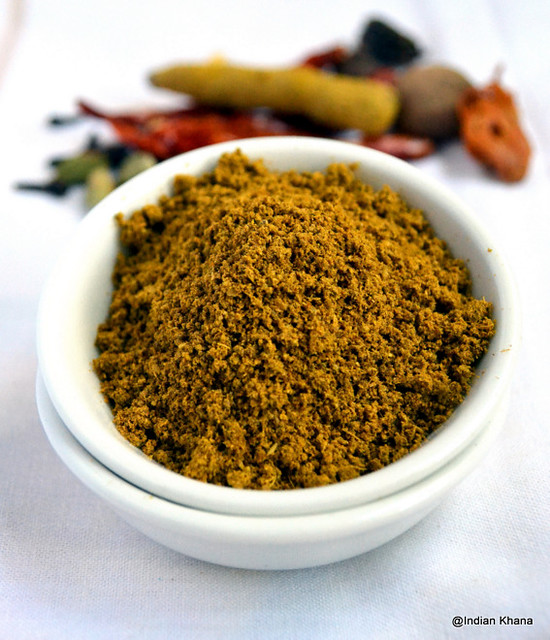
Ingredients for Kitchen King Masala Powder

Cumin Seeds/Jeera  - 1 tbsp
Caraway Seeds/ Shah-Jeera - 1/2 tbsp
Dry Red Chilli/Sukhi Lal Mirch - 8
Turmeric/Haldi - 1 pieces or Turmeric Powder - 1 tsp
Coriander Seeds/Dhaniya - 1 tbsp
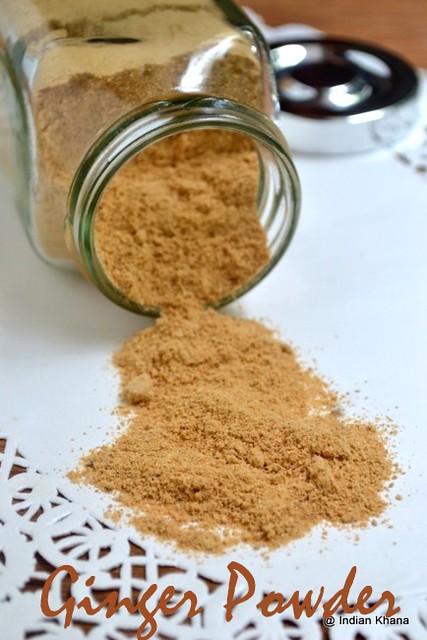
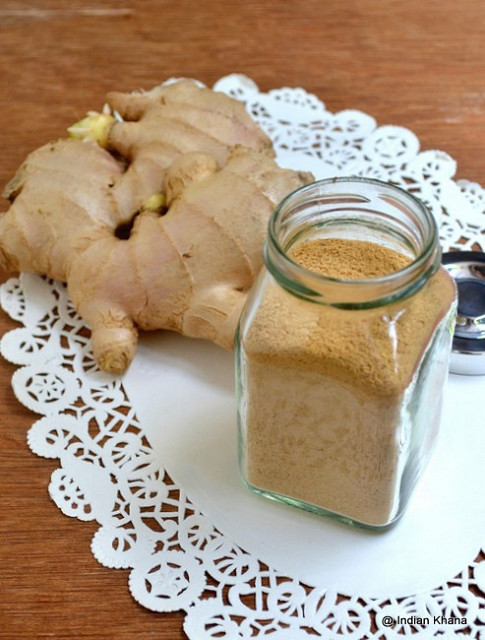
Dry Ginger/Saunth/Sukku - 2 pieces [I used  Ginger Powder - 1/2 tbsp]
Black Peppercorns/Kali Mirch - 1/2 tbsp
Cloves/Laung - 8
Whole Yellow Mustard Seeds/Pili Rai - 1/2 tbsp
Green Cardamom/Hari Elachi - 8
Black Cardamom/Badi Elachi - 3
Fenugreek Seeds/Methidana - 2 tsp
Bengal Gram/Channa Dal - 2 tbsp
Fennel Seeds/Saunf - 1 tbsp
Cinnamon/Dalchini - 4 sticks 1" each
Star Anise/Chakri Phool - 1
Nutmeg/Jaiphal - a small pieces or 1/2 tsp grated/powder
Mace/Javitri - 2 small pieces
Poppy Seeds/Khus Khus - 1 tbsp [I didn't use  & not listed in ingredients picture]
Rock Salt/Kala Namak - 1/2 tbsp [Not listed in ingredients picture]


Method:

1. Dry roast all ingredients one by one and allow to cool.
~ Don't have to roast powder like ginger, nutmeg etc if using in powder form.  You can roast all ingredients together too but I never do that.
2. Cool all the ingredients and grind into smooth powder using mixer or coffee/spice grinder.  Sieve powder through a big strainer, grind again if required and discard any large pieces of spice.
Cool powder masala to room temperature and store in air tight container.


Have a nice day ~~

Homemade Mixed Fruit Jam Recipe


Homemade is better any day doesn't matter what ever that may be and homemade jams too fits the bill, we can control sugar quantity, add our choice of fruits and most important we know it has been made in a hygiene environment, not to mention homemade jams taste more delicious than anything for the simple reason that it's fruit of our labour.


I started making jams couple of years back and that's thanks to blogging we intend to try new things.  I have tried all those crazy combination, sugar replacement and what not but among all mix fruit jam is family favorite.  But somehow whenever I make jam I never managed to take pictures, I always think I will do it tomorrow and we all know that tomorrow never comes thus none of my jam appeared in this blog.   I was planing to make jam again for quite some time now but it was not happening until last week I pulled myself and decided complete the task.


I have used fruits available in my pantry you can use any fruit of your choice.  Since I added more of black grapes color of jam is nice dark brown, if you like your jam to be in red/dark pink color then add more of strawberry and less of red grapes.  Don't miss apple and a well ripen banana, while cooking the jam the banana fragrance was mind blowing and it also helps to add sweetness.  Don't worry about the timing, just keep flame in slow and do your other things but remember to stir in intervals, don't keep forget about it totally :) Step-vise pictures are taken from my hand phone, that particular time I couldn't find camera memory card so clicked with hand phone, old habits hardly dies :) so ignore the picture quality, won't you?


Ingredients for Mixed Fruit Jam

Apple - 1
Ripe Banana - 1
Orange - 1
Plum- 3
Sugar Prune - 3
Seedless Black Grapes - 2 Cups
Sugar - 1 1/2 Cups Or More if needed
Lemon Juice - 1/2 tbsp or Citric Acid - 1/4 tsp


Method:

1. Peel, core and chop apple, plum, prune, orange and banana.
2. In a blender or mixer add all the fruits and blend until smooth. [I got 4 cups of puree]

3. Bring the fruit puree to a pan, add sugar, stir and cook in medium to bring it to a boil. Slow flame and simmer until it thickens stirring in regular intervals.
4.  Once jam starts to thickens, add lemon juice/citric acid and mix well.

5. Cook until jam becomes thick  it takes around one and half hour in slow flame, do stir in intervals.
~ My jam is little more on thick, firm side the way I like. You can stop cooking once desire consistency reached, just make sure to cook in slow flame and stir regularly.

Tips to Check if jam is ready ~
1. If you lift your spatula and pour jam, it should flow together and not in drops.
2. Pour few drops of jam in a plate, if it's spreads then it's not ready, if it's stays firm without moving then your jam is ready.

6. Remove from heat, allow to cool slightly and store in sterilize jar.

Isn't it looks gorgeous, nice and glossy?


Variations ~ 
~ You any use any fruit of your choice like pineapple, strawberry, all types of berries, papaya etc
~ Use strawberry more for the dark pink color jam.
~ Increase sugar quantity to suit your taste, for us this itself I find it sweet.


Have a nice day ~~

Green Bean Sprouts | Moong Dal Sprouts


Green Bean or Moong Dal Sprouts are one of the easy thing to prepare and very healthy.  As my this year plan is to start posting reader request this is one of those requested recipe.  I not really a big sprouts fan other than for moong dal, any other sprout I can easily give a miss.   I used to sprout a lot and then in between I totally stopped doing it for no reason what so ever.  For past few weeks I again started to sprouts moong bean and guess what I doing this every alternative days now.


As most of the recipes even moong dal sprouts are made in few ways but I always follow the below method and satisfied with result.  The best way and to absorb all the nutrition from sprouts is to eat it raw but I know that's not everyone's cup of tea so for a start you can try making this simple khichdi with sprouts.  And as you have guessed I will post some sprouts recipes soon.


Ingredients [ Yields 2 Cups of Sprouts]

Green Bean | Hara Moong Dal - 1/2 Cup
Water - To Soak


Method:

1. Wash and Soak green bean (moong dal) 6 hours or over night.

2. Rinse again soaked bean and transfer to a wet muslin cloth.  You can also use clean cotton cloth.

3.  Take a corner of cloth and roll it to loosely tie and secure green beans as shown below and then tie it on a top or anywhere you wish.   You can also keep the beans in a large bowl and cover it and keep in dark place.

4. Leave it over night to sprouts or you can let it sprouts for 12 hours to 24 hours too.  Don't go beyond 24 hours.   And our beautiful sprouts are ready to use.

Notes ~
~ Refrigerate sprouted beans if you are not using it same day otherwise it start to taste little bitter.
~ Try to finish sprouted moong with-in 2 days

Homemade Ginger Powder Recipe


This ginger powder recipe post is pending from the time I posted garlic powder.  Making ginger powder at home is so easy and economical, not to mention freshness we get can’t be compare.  I used to buy ginger powder and never really like the smell and after a while it’s turns into bad smell and taste.  This ginger powder recipe is again my SIL recipe, she makes this in huge batches and keep.


I had step vise picture, now it seems I lost those, but this recipe is so simple and straight forward that stepvise pictures are really not indeed.  You can make this in small quantity for a start if you want and store.  Try this once and you will not go back to store brought ginger powder anymore.  If you like ginger tea then mix little amount of this ginger powder with tea dust/powder and store, you easy instant ginger tea ready.


Ingredients:
Fresh Ginger - 1/2 Kg or as you want


Method:

1. Wash ginger 5-6 times in fresh water each time or until ginger gets very clean.  We don't have to peel ginger.
2. Chop ginger in to small pieces.  Smaller you make better it is.
3. Sun dry ginger pieces in a clean cloth for 2 days or until ginger gets completely dried, it may take 1 day or 3-4 days too.
4. Once ginger is totally dried pulse in mixer or spice grinder into fine powder in batches if making in large quantity.
5. Sieve ginger powder, transfer back the remaining amount into mixer and grind again.
6. Sieve one more time and sun dry for 30 minutes ginger powder again.
7. Store in air tight container and use as required.

The powder you see in picture is more than a year old and it’s still fresh with strong fragrance. 


 Have a nice day ~~

Homemade Dabeli Masala Recipe

 2
I like to make my own masala powders instead of buying ready made as homemade ones are always fresh, fragrant full and nothing can beat that.   Coming to this dabeli masala I made for my Dabeli obviously right?  Well you can use ready made ones but then it’s so easy to make at home and hardly takes 5 minutes then why not?  Most of the ingredients are always available in your pantry so give it a try, this masala you can use for pav bhaji or as normal garam masala too not just for dabeli.   I made this in small quantity and these ingredients makes around 2 tbsp of masala, if you want you can double or triple the ingredients, make this in large batch and store.  But then it’s so easy to prepare then why to store just make fresh every time you need.
*Different color of masala you see it's due to lighting, so ignore that please.

Easy homemade dabeli chaat masala powder recipe  copy

Also check out how to make Dabeli

Recipe for Dabeli Masala

Ingredients:
Cumin Seeds - 1 tsp
Fennel Seeds - 1/2 tsp
Black Peppers - 1/2 tsp
Coriander Seeds - 1 tsp
Clove - 5
Dry Red Chilies - 5 [stems removed]
Mace (Javitri) - 4 blades  [or powder 1/4 tsp]
Nutmeg Powder (Jaiphal) - 1/4 tsp
Whole Star Anise - 1
Bay Leaves - 2
Black Cardamom - 1
Green Cardamom - 4
Ginger Powder - 1/2 tsp

Paav Chaat Dabeli Masala Recipe
Method:
1. Dry roast all ingredients one by one until fragrant.  Don't roast any powder if using like nutmeg, ginger powder etc.

Dabeli masala recipe

2. Allow everything to cool down, transfer to a mixer or blender and grind to fine powder. 
home made Dabeli Masala powder recipe
That’s all it’s as easy as this and our dabeli masala is ready. 

Homemade Dabeli Chaat Masala Recipe

Have a nice day ~~

Home made Garlic Powder | How to make Garlic Powder


Homemade garlic powder
I like to use garlic powder in savoury baking plus now in my everyday cooking just cause I love garlic.  So I wanted to make my very own garlic powder at home some time back like couple of years ago, but I  found it’s required lot effort or a dehydrator to make a good garlic powder !  After I while I gave on the idea and totally forgotten about it until My sister-in-law made garlic powder at home without any special gadgets and when I saw the garlic powder it’s texture was exactly like any readymade garlic powder with much more stronger smell.  I immediately ask my SIL how she did it only to realised how obvious it was, proving making garlic powder at home is so easy and anyone can do it. 
Garlic powder recipe home made
When I did post on how to make almond flour I never thought it will become one of the popular post of this blog with numerous feedback from readers, it’s good to know simple things does help some one and with same motivation doing this post on how to make garlic powder at home.  If you think procedure it’s long then let that put you off it’s quite easy.  There’s nothing like fresh home made garlic powder and not to mention money we can save.  
Tutorial on homemade garlic powder recipe
How To Make Garlic Powder
Ingredients:
Garlic Pods - 1 Cup [ or use as much as you like]
Method:
1. Peel garlic and dry under sun for 2 days.  [You can slice garlic pods if having large pods like in this post pictures]
2. Grind peeled and dried garlic in a mixer, food processor or coffee grinder and pulse for 2-3 minutes until it become smooth paste.  Every time don’t pulse more than 30 seconds.
~ Don’t panic if you see garlic has become paste instead of powder, we have little more work to make paste into powder.
3. Take a plastic sheet or clean thin cotton cloth and spread garlic spread in very thin layer(spread garlic paste over plastic sheet or cloth evenly), dry under sun for 4-5 days.   Garlic paste will be become like thin crackers/pieces and it will come out of sheet or cloth easily.
~ If you break and crush between fingers garlic dried pieces (crackers) will become powder.  If you feel it’s still little wet or forming lumps instead of powder then you have to dry for 1-2 days again.  Repeat the test until you get powder consistency.
4. Collect all dried garlic pieces and pulse again for 1-2 minutes in a dry mixer or food processor this time not more than 15 seconds for each pulse.  You will get your very own garlic powder.
5. Spread powder on a sheet/cloth or paper and dry under sun for 1hour, don’t dry long if not powder will start to form lumps. 
~ We dry one last time for 1 hour to remove any moisture from grinding. 
6. Store in air tight jar/container.
Note:
1. Instead of sun drying you can dry peeled garlic in oven.  Preheat oven to 150degree and toast garlic pieces until it completely dry, stir in regular intervals.  After it cools down grind into powder and do step 5.
Easy homemade garlic powder recipe garlic recipe
How to Store Garlic Powder
Now this is important, when I used to buy garlic powder I realized very soon that if kept at room temperature it’s forms lumps very quickly and I started to keep my garlic powder pack in fridge and use as and when required or keep outside only a small amount.
So here we have to do same thing, keep your garlic powder jar/container in fridge and use as required.  Or keep small quantity outside for daily use. 
Now, if you keep garlic powder in fridge it will still be forming lumps like you can see in below picture, this huge piece is of garlic powder kept inside fridge.
Home made garlic powder recipe
If I press with finger with no pressure it’s easily becomes powder again, you can see in below picture a small dent and powder beneath it.  That’s the portion I pressed with my finger and it started to crumble in powder.  For this size of pieces I generally press it down with back of ladle or spoon.
How to make Garlic powder at home
So far so good?  But if you notice below picture carefully these pieces of garlic powder is not easy to break as above because it got moisture and formed lumps.  If I press again with my fingers it won’t become powder but it will be little  sticky.  Here again I use spoon to break this lumps in small pieces and then to press those small pieces to make it powder.  Every time we may not get powder but tiny pieces due to moistures so just use it those pieces in your normal cooking. 
Easy garlic powder home made recipe
Few pointers to keep garlic powder intact for long time (easily for 6 months)
1. Use clean, DRY,  air light container/jar to store garlic powder
2. Every time use clean and dry spoon. [Never use hand  and touch garlic powder]
3. Immediately close jar again after taking our required quantity.
4. Store in refrigerator.
5. If making in large batch say for 1kg or 2kg of garlic, for daily use store small quantity in small bottle or jar and remaining in another large bottle.  Store both jars in fridge.
how to make garlic powder recipe
I hope you find this post useful, if any doubts do ask me.
Have a nice day ~~

Aloo Pakoda | Potato Fritters Recipe

 Urulai kizhangu bhaji aloo bhajiya recipe
Gong Xi Fa Cai to all celebrating Chinese New Year, may year of Dragon be more fruitful n joyful.
Coming back to today’s recipes whether we call it Aloo Pakoda/pakora or Bhajiya as at in-law’s call it or south Indian style bhajji, it’s the same thing, now a days we have rain God blessing in Singapore and aloo bhajiya is perfect company along with garama garm Chai aka Tea to enjoy the rain.  Normally potato fritters is made by cutting the potatoes in thin roundels and dipping in gram flour batter which I have blogged in my Assorted Pakoras Post
Aloo pakora recipe

This style of making pakoras is my mom recipe, and this more tasty than the usual aloo bhajiya, she doesn’t add curry leaves but I do as curry leaves adds good flavour to the pakoras and I also add rice flour to bring little crunchiness ….so do try adding both.
potato fritters alu bhajiya
Ingredients [Serves 3-4]
Potato - 2 Large
Besan/Chickpeas Flour - 1 Cup
Rice Flour - 2
Curry Leaves - 1 sprig [chopped]
Red Chilli Powder - 1 tsp
Turmeric Powder - 1/2 tsp
Cooking Soda - 1/4 tsp
Salt - to taste
Water - as needed (around 1/8 cup)
Hot Oil - 2 tbsp
Oil - To deep fry
aloo potato pakora recipe
Method:
1. Peel, wash and dice potatoes, transfer in a large bowl and add rest of ingredients except oil.
Aloo Pakoda-1
2. Give a good stir, now add water 1 tbsp at a time and mix until everything comes together, this doesn’t require so much of water so keep adding water only in less quantity. 
Aloo Pakoda recipe
3. Heat oil a in wok, take 2 tbsp of hot oil & mix with potato mixture.   Scoop a spoon of batter and drop in oil, do this 4-5 times to get 4-5 pakoras and fry until golden brown in medium heat. 
If using hand, scoop around 4-5 pieces of potato for one pakora and deep fry.
Alu potato pakode recipe
Delicious pakoda/bhaji is ready.
Urulai kizhangu bhaji potato baaji
Have it with coconut chutney, sauce or just with hot tea/coffee. 
Aloo bhajiya recipe
Have a nice day ~~