Italian Pepper Biscuits

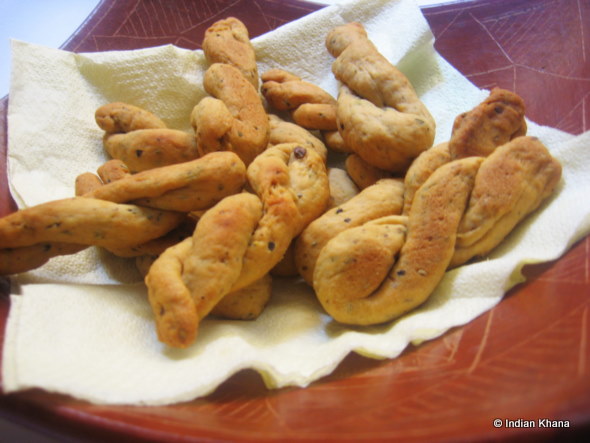
I like savory biscuit then sweet I have said this before rite? And when the recipe is like so simple then nothing can hold me back from trying it.  This biscuit is again very easy like Wheat Almond Cookie, tasted much better than I expected.  It's crunchy with lot of flakes and the pepper, herbs add such wonderful flavor, each bite is just so yum.  I really loved it the fact that it's very flaky and smell so good, everyone if you open the box you are storing these biscuit you will get hit with this amazing pepper and herbs fragrance.


I just happen to find this recipe while I was looking for something else, it's keeper for me and am sure if you try you won't be disappointed too.


Makes 18 pieces
Ingredients:
Adapted from Foodblogga
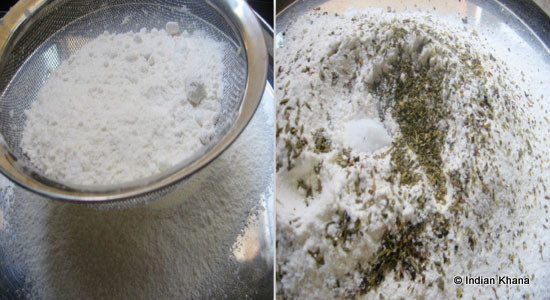
Plain Flour - 1 Cup
Crushed Peppercorn - 1/2 tsp [fresh is better]
Italian Herbs - 1/2 tsp
Fennel Seeds - 1 tsp
Baking Powder - 1 tsp
Baking Soda - a pinch
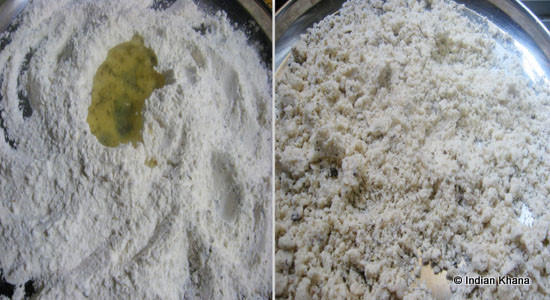
Olive Oil - 1/4 Cup
Salt - to taste [ 1/4 tsp heaped I used]
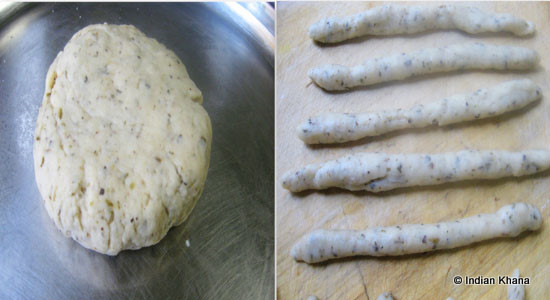
Water - 1/4 Cup + 1 tsp OR as needed


Method:

1. Preheat oven to 375F or 180C.  Sieve baking powder, soda and flour, add freshly crushed pepper corn, herbs, fennel seeds, salt and mix well.  


2. Add oil in 2 batches and mix with flour, rub between hands to get sand like texture.  Adjust salt and spices if required.


3. Add water in small quantity with flour mixture and make a soft dough.
~ I used 1/4 Cup and then added 1tsp of water again to bring all the flour together so you have to add water in small quantity, make sure the dough is not sticky but smooth, if not add 1 tbsp of flour and mix again.

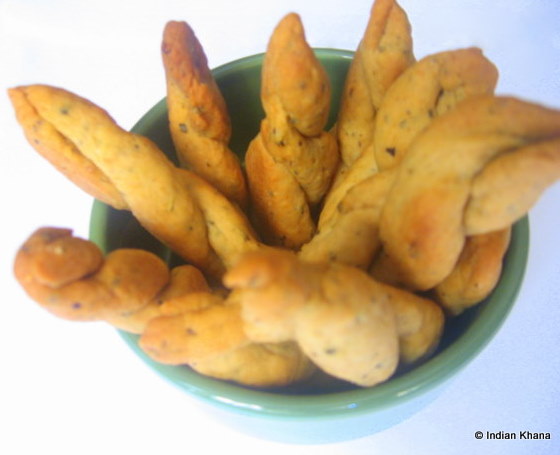
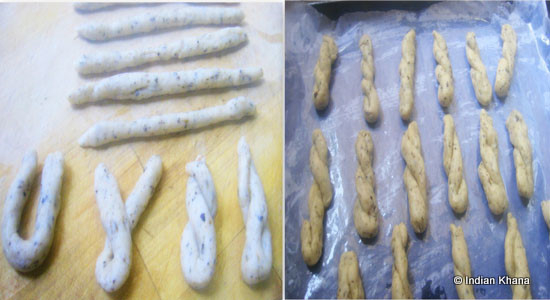
4. Divide the dough into equal portion.  Roll the dough between floured or oiled hands and make it into cigar shape.  


5. Form a U shape, then criss-cross the pieces until a braid forms as shown in the picture.  Place each piece an inch apart on a baking tray lined with greased cookie sheet.
~ Or use roll the dough and use your cookie cutter to give any desire shape


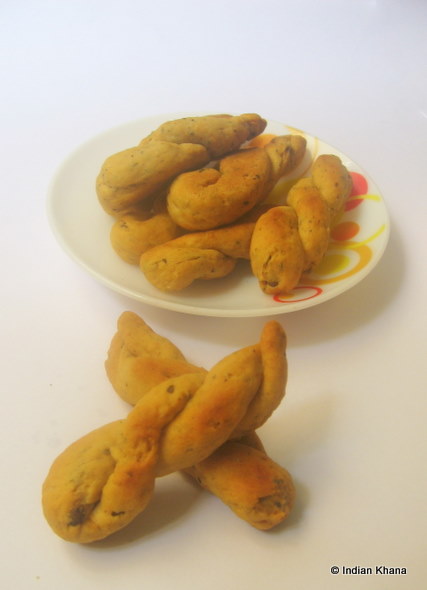
6. Bake for 40 minutes or until the biscuit is golden brown, after 20 minutes flip the biscuits.  Cool on a wire rack and store in air tight container.

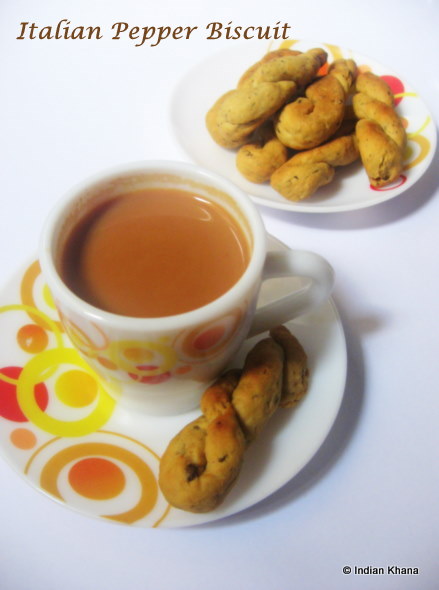
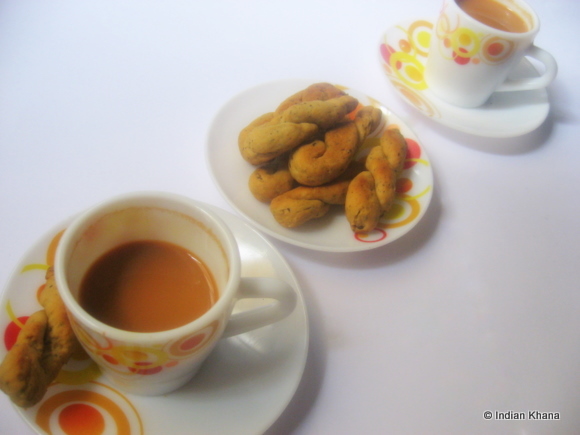
This is what happens if a hungry soul takes pictures,  I drank half of tea and ate few biscuit by the time I finished clicking :D


Note:
~You can also brush the top of biscuits with egg wash  before you bake it, I didn't do that.
~ You can reduce the pepper to 1/4 tsp if you think 1/2 is too spicy for you.

It makes a very good tea time snack.  And sending this to Only Bake Event by Tamalapaku and a event started by Food delicious.


And sending this to Only Bake Event by Tamalapaku and a event started by Food delicious.

 
Have a nice day ~~

Spring Rolls Recipe

Myself and my ex-colleague were chatting few days back and one thing leads to another and she asked me if I can help her to make some appetizers as she is hosting a get together.  I was like oh fine sure, me being on my best behavior ...well am best behaved most of the times :D  Anyways coming back to the point so she wanted Spring Rolls and she said she don't want Indian Style, it has to be Chinese style spring roll, to be more precious it has to be like Old Change Kee


Time for me to make a trip to Old Change Kee, they sure don't use cabbage for filling it's something else but what's that I have to find!!  Uncle Google is there for our help and I found Jicama is used to make spring rolls.  Jicama is also know as Mexican Potato, Mexican Turnip,  Yam or Yam Bean.  In Chinese it's known as Bangkwang or Bang Kuan and in Hindi it's Mishrikand and ya before you ask me it's available in Cold Storage, Fair Price and wet market you just have to look for it.   And here is how Jicama looks like (image source google)


I wanted to do a step vise post but on that particular day I had too much in hand and couldn't click anything, you don't mind that right?  I used one full regular spring roll pack which comes with 50 pastry sheets but here giving you guys recipe to make around 10 spring rolls.


Ingredients:

Spring Roll Sheets - 10-12
Jicama/Mishrikand - 2 Cups
Carrot- 1/4 Cup
Garlic - 1 Pod (Large)
Light Soya Sauce - 1 tbsp
White Pepper Powder - 1 tsp
Salt - to taste
Vegetable Oil - for deep frying

For Sealing Paste:
Corn Starch/Maida - 2 tbsp
Water - 5-6 tbsp


Method:

 1. Thaw the pastry sheet as instructed on the cover, normally it's about 40-45 minutes.  Cover the sheets with a wet kitchen towel always, this is to avoid the sheets from getting dry.

2.  Wash, peel and finely chop or grate jicama and carrot and garlic.

3. In a pan heat 1-2 tbsp of oil, add garlic and saute until just light brown.  Now add carrot, jicama  stir well and cook in high flame for 2 minutes. 

4. Add soya sauce, pepper powder, salt and stir well, cook for 3-5 minutes or until jicama and carrot is cooked but still crunchy.
~ Careful while you add salt as soya sauce has salt too.  You can also use black pepper powder and cooking time depends on how you chop or grate the veggies.  If you grated the veggie then you have to cook for 2-3 minutes only, don't make it soggy.

5. Allow the stuffing to get cool. Mix maida and water to form a thick sealing paste.

To Assemble spring roll:

6. Take one spring pastry sheet and lay on a  chopping board, add 2-3 tbsp of filling on bottom corner of sheet, lift and fold it to bring the filling until halfway.

7. Apply sealing paste on sheets corner, fold left side and then right side towards center and fold again to complete the seal tightly.  
~ While you work on one sheet make sure rest of the spring pastry sheets are covered with wet towel.

8. Deep fry until golden brown on all sides, drain on paper towel and serve with any sauce of your choice.

Spring Rolls goes well with plum or tomato sauce.  


Have a nice day ~~

Vegetable Stew

Does it happen to that you start to make something and along the way it gets transform into something else? No? Well it does happen to me once in a while, like in this stew or what I should call it is thinking.  I actually wanted to make aloo masala like in we have that with poori? And then I started to add this and that and came up with this which actually turns out to be good.  A nice combo for  idly, dosa, paratha or puri.


Ingredients:

Boiled Potato - 2
Onion - 1 Large
Carrot - 1 
Green Peas - 1/4 Cup ( I used frozen)
Tomato - 1 Large
Green Chillies -2
Ginger-Garlic Paste - 1 tsp
Cumin Seeds - 1/2 tsp
Mustard Seeds - 1/2 tsp
Gram/ Urad Dal - 1/2 tsp
Curry Leaves - few
Bengal Gram / Channa Dal - 1/2 tsp
Red Chilli Powder - 1 tsp
Turmeric Powder - 1/2 tsp
Lemon Juice - 1/2 tbsp
Salt - to taste
Oil - 1 tbsp
Water - 1 to 1.5 Cup


Method:

1. Dice the boiled potato, finely chop onion, tomato, green chillies, carrot and thaw frozen peas.
~ If using fresh peas boil it along with potato.

2. Heat oil in a wok/pan, add cumin & mustard seeds and allow to crack.  Add urad & channa dal, curry leaves and sauté until golden brown.

3. Add ginger-garlic paste sauté for 30 seconds, add onion, green chillies and sauté until onion becomes transparent.  

4. Add carrot and cook for 2 minutes, add tomato, peas, red chilli and turmeric powder along with salt and give a good stir.   Cover and cook on low-medium flame until tomato mashes.  

5. Add 1 cup or 1.5 cup of water and bring it to boil, now add potato and cook for 3-4 minutes in medium flame or until everything is cooked.  Adjust salt if required, off flame and add lemon juice.

Our stew is ready, and if you have boiled potato in hand it's very quick to make.


Have with anything of your choice, we had it with dosa


 Have good weekend ~~

Aloo Aur Pyaaz Ki Bhujia | Potato & Onion Stir Fry

I know I post lot of stir fry recipe but then these are very handy recipe when you don't feel like cooking or in a rush it can be a saver, specially after coming home from office I break my head what to cook easy & quick and those days these kind of simple recipe really save my time and energy.  This is one of my favorite stir fry, during our school days a regular lunch box along with roti or paratha and a pity that I never really did this combination.  So one of these days I was thinking what to make and suddenly I thought of this aloo pyaaz ki bhujia, it's so simple and yet to tasty.  Though let me warn you its highly additive oh ya you can get addicted to a simple stir fry too...don’t always have to be a fancy dish ;) 


Serves ~ 2-3
Ingredients:

Potato - 2 Large
Onion - 1 Large
Cumin Seeds - 1 tsp
Dry Red Chilli - 2 broken
Turmeric Powder - 1/2 tsp
Oil - 1 tbsp
Salt - to taste


Method:

1. Peel, wash and cut the potato lengthwise and slice the onion.


2. Heat oil n a pan/wok, add cumin seeds and allow spluttering, add broken red chilli and sauté until brown.

3. Now add potato mix well and cook in medium to slow flame until potato is half cooked takes around 5-7 minutes in slow flame, stir in intervals.


 4. Add onion and sauté until it becomes transparent.  Add salt and turmeric powder, mix well.


5. Cook until potato gets fully cooked.  Off the flame and cover the pan let it sit for 5 minutes before you dig in.


Goes well with roti or any type of paratha, variety rice or rasam/sambar/dal rice.


Enjoy your day ~~

Paruppu Podi

I like any type of podi and mostly I use my idly podi along with rice too, I made this paruppu podi for my nephew whom is one picky eater and after this podi he ate this every day until it was finished and asked me to make some more.  I searched a few recipes for paruppu podi but nothing interested me and came up with my own.  It's quite simple with few ingredients and taste delicious.


Ingredients

Urad Dal - 2 tbsp
Daliya/Roasted Gram Dal/Pottukadalai - 1 Cup
Desiccate Coconut - 3 tbsp
Dry Red Chilies -6
Peppercorn - 5-6
Garlic - 2 pods large 4 pods if using small ones
Hing/Asafoetida - 1/4 tsp
Cumin Seeds - 1/2 tsp
Oil - 1/2 tsp 
Salt - to taste


Method:

1. Dry roast urad dal, daliya/roasted gram dal, red chilies separately until golden brown, keep aside to cool.
2. In a same pan add oil and saute garlic, off the flame and saute coconut for a minutes, transfer to a plate and let it cool too.
3. Grind all the ingredients except coconut to powder in a mixer.  Now add coconut and grind again to fine powder, adjust salt if required.  

Cool the powder and store in airtight container.


Have it with warm steamed rice and ghee.

Enjoy your day ~~

Gatte Ki Sabji | Chickpeas Flour Dumplings In Yogurt Sauce

Gatte ki sabji is one of my favorite if made properly and so far I only like the way my sister does.  I tried few methods but nothing like what she does so this time I asked her to show me and wrote down the recipe and hurray I tried it got it just like her.  If you face problems like me of not having vegetables at home some day (okie for me it's most of the days !!) then this curry comes very handy.  


And like most of the recipes gatte ki sabji also has many version, some people make with onion and tomato some don't.  This  is one of simple recipe and taste very good you have to try to know exactly how good it is if followed the recipe properly.  I have mention about gatte ki sabji here in the platter I made and this platter & this curry goes to Sonu's Flavours of Rajasthan a event started by Nayna.


Ingredients:

For Gatta

Besan/Chickpeas Flour - 3/4 cup
Red Chili Powder - 1 tsp
Turmeric Powder   - 1/4 tsp
Jeera/Cumin Seeds - 1/4 tsp
Oil -2 tsp
Salt - to taste
Water

For Gravy

Oil - 1 tbsp
Cumin Seeds - 1/2 tsp
Mustard Seeds - 1/2 tsp
Curry leaves - 1 sprig
Red Chili Powder - 1 1/2 tsp
Curd - 3 tbsp
Water - if required
Salt - to taste
Cilantro - For garnishing


Method:

1. In a bowl or plate add all the ingredients 'for gatta' except water.


2.Mix everything together to make crumbs add little water in very small quantity and make thick dough.  If you add more water the dough will be sticky so add water only in tbsp each time. 


2. Divide the dough in equal portion and roll into thin long pieces like in log/cylinder shape and boil in water until cooked or for 8-10mintues.


3. Cut the gatta in small pieces. In the boiled water mash 5-6 pieces of gatta, if required add little more water.


4. In a pan heat oil,  add cumin, mustard seeds, curry leaves and allow to splutter.

5. Add together red chili powder and curd and mix well to avoid the curd from curdling.  
~This is the important step, you have to add red chili and curd together and stir well, if not you will not get the perfect gravy.


6. Cook for 2 minutes in medium flame and add gatta pieces.


7. Add the mashed gatta water to the curry, salt and  mix well, cook for 2-3 minutes and off the flame. 


Garnish with cilantro.  It's best to have it hot/warm as the gravy become thick very fast,  if you going to eat later and just add little water and re-heat it.  Goes well roti/paratha.  

See how nice the gravy looks ..simple pleasures of life :)


Enjoy your day ~~

Vanilla Cake with Frosting

Last week was my neighbor cum friend anniversary and like last year I baked a cake this year too.  Last year I did a tutti fruity cake with butter cream frosting and this year I decided to go with vanilla cake as she doesn't like chocolate. I wanted to try cream frosting and this seems to be perfect occasion for it.  I followed the sponge cake recipe from Prema blog and for the design too followed her chocolate cake recipe, her steps are quite detail n helpful and ofcourse she cleared all my doubts generously so thanks to Prema :)  


Ingredients:

For Sponge/Vanilla Cake

Plain Flour - 130 grams/ 1 Cup heaped
Egg Whites - 4
Egg Yolks -7
Granular  Sugar - 200 grams/ 1 Cup
Salt - 3 grams / a pinch
Milk - 30 ml / 2 tbsp
Oil - 30 ml / 2 tbsp
Vanilla Essence - 1 tsp

For Cream Icing

Whipped Cream - 200ml
Icing Sugar - 130 grams / 3/4 Cup
Pink Food Color - 1/2 tsp


Method:

1. In a bowl beat egg whites and sugar until sugar dissolves and egg white form peaks.


2. Add egg yolks and beat until everything blends well.  Double boil for 2 mintues or until it reach 40-42C.


3. Add flour and mix well.  Now add vanilla essence, milk and oil and mix well to blend everything together. 


4. Preheat oven to 180C and grease a 9' pan and pour this cake batter.  Bake for 30-35 minutes or until the top becomes golden brown.  Insert a toothpick or knife in the middle, if it's comes out clean then the cake is cooked if not bake for 5 minutes more. 

5. Let the cake cool completely on a wire rack till we prepare the icing.  


6. Beat the whipped cream and icing sugar until it form peaks.  Divide the cream into 2 parts, in one part add any color of your choice, I used pink and mix well. 


7. Once the cake is cooled cut it into 2 layers.  Do it slowly and this cake is very soft and it tends to break.  

8. Add a good amount of whipped cream on one layer and over the top well.  Remove excess cream.

9.  Now keep the second layer cake on top if it and cover the whole cake with pink color cream.  


10. For cake decoration you can do anything that fancy you, I just tried here basket weave  design and used pink and white color cream, so we need 2 piping bags one with pink and other with white whipped cream using wave tip.


11. Draw vertical 2-3 lines with pink color and then on top of if white horizontal lines.  

12. Pipe vertical lines and then horizontal one's that fits the horizontal lines.   Repeat this process to cover rest of the cake.  


13.  On a cake top I did rope design which is done with white cream using star nozzle, arch the pipping bag and draw a curve in 'S' shape; insert tip under the bottom curve of the "S" shape and draw a curve 'S' again.  Repeat this for the whole cake.  

14. In the center written is happy anniversary, just add some brown color with white whipped cream.    You can place some fresh fruits or flowers too. 


And this how the cake looks inside.